Audi A3 (8V) – Activate trailer hitch (retrofit) (Coding)
Purpose: Allows you to activate the trailer hitch as a second-fit (trailer / towbar retrofit).
Attention! The adaptation in the engine control unit 01 is not accepted for some models. In this case, the coding can be skipped. Control units that are not installed can also be skipped. It should be noted that some coding steps must be carried out depending on the installed part numbers (camera).
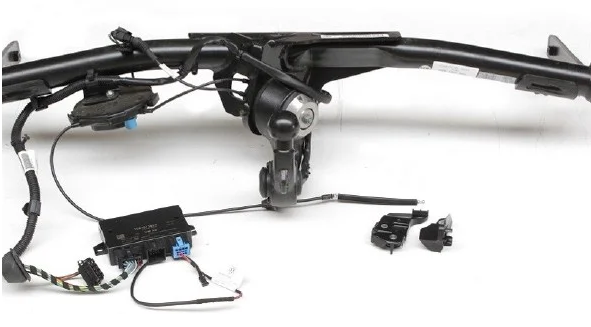
Attention!! There are, here, 12 lines of coding to do at most depending on your installed modules, most calculators have a long coding with “trailer” to activate!
Proceed:
1 – Engine off, ignition off, connect your official VAG-COM VCDS cable to
the computer then connect the other end to the diagnostic socket of your vehicle.
2 – Switch on the ignition then launch the VCDS program.
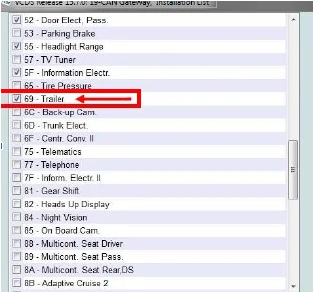
Line 1:
3 – Click on ” Select ” then click on ” 19 – CAN Gateway “.
4 – Select “Installation List”
5 – Check: ” 69 – Trailer ” in the list
6 – Save the coding
Line 2:
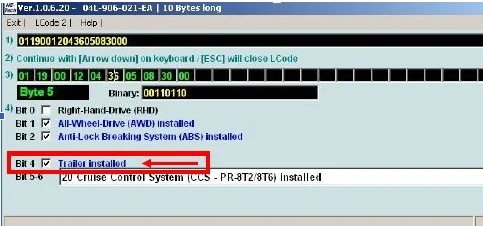
3 – Click on “ Select ” then click on “ 01 – Engine ”.
4 – Click on “ Coding – 07 ” then click on “ Long Coding Wizard ”
5 – Choose the byte “ 05 ”
Then check the Bit “ 4 ”: “ Trailer installed ”
Line 3:
3 – Click on “ Select ” then click on “ 09 – Power station ”.
For power plant with coding:
4 – Click on “ Coding – 07 ” then click on “ Long Coding Wizard ”
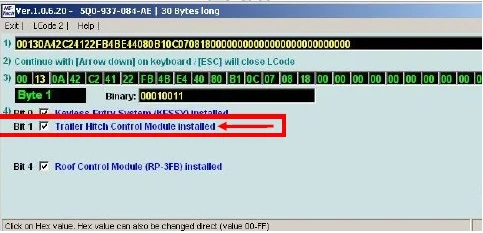
5 – Choose the byte “ 01 ”
Then in this drop-down menu of “ Bit 0-7 ”, select “ 01 Trailer Connector Diagnosis active ”.
Or byte “ 01 ” check Bit 1 “ Trailer Hitch Control Module Installed ”.
For power plant without coding:
4 – Click on “ Security Access – 16 ” then type the code “ 31347 ”
5 – Click on “ Adaptation – 10 ”.
6 – On this page, at the very top, there is a drop-down menu.
In this drop-down menu, choose “ Networking trailer connection device ”
7 – On this same page, there is a second drop-down menu but towards the bottom
of the page.
On the latter, choose “ built in ” then validate.
Line 4:
3 – Click on “ Select ” then click on “ 03 – ABS Brake ”.
4 – Click on “ Security Access – 16 ” then type the code “ 24990 ”
5 – Click on “ Adaptation – 10 ”.
6 – On this page, at the very top, there is a drop-down menu.
In this drop-down menu, choose “ trailer stabilization ” .
7 – On this same page, there is a second drop-down menu but towards the bottom
of the page.
On the latter, choose “ Activated ” then validate.
3 – Click on “ Select ” then click on “ 10 – Parking Assistance ”.
4 – Click on “ Security Access – 16 ” then type the code “ 71679 ” (optional code)
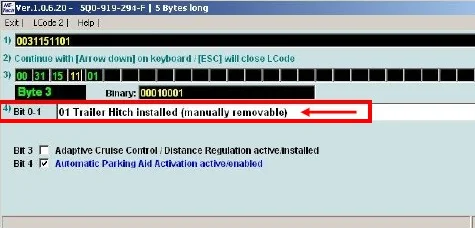
5 – Click on “ Coding – 07 ” then click on “ Long Coding Assistant ”
6 – Choose the byte “ 03 ”
Then check Bit 0-1 “01 Trailer Hitch installed (manually removable)”
Line 6:
3 – Click on “ Select ” then click on “ 13 – Auto Dist. Reg. ”
4 – Click on “ Security Access – 16 ” then type the code “ 14117 ” or “ 20103 ”
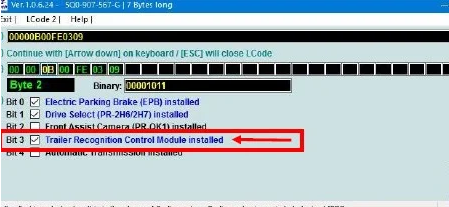
5 – Click on “ Coding – 07 ” then click on “ Long Coding Wizard ”
6 – Choose byte “ 02 ” (camera 5Q0) or “ 03 ” (camera 2Q0/3Q0)
Then check Bit 3 “Trailer Recognition Control Module installed”
Line 7:
3 – Click on “ Select ” then click on “ 34 – Correct. Assiet. “.
4 – Click on “ Coding – 07 ” then click on “ Long Coding Assistant ”
5 – Choose the byte “ 00 ”
Then check bit 7 (“trailer, 0 = not installed / 1 = installed”)
Line 8:
3 – Click on “ Select ” then click on “ 3C – Lane Change ”.
4 – Click on “ Coding – 07 ” then click on “ Long Coding Wizard ”
5 – Choose byte “ 02 ” (camera 5Q0) or “ 00 ” (camera 2Q0/3Q0)
Then check Bit 4-7 “10 or 20 ECU for draw bar, with ECU for draw bar”
Line 9:
3 – Click on “ Select ” then click on “ 6C – Rear View Camera ”.
4 – Click on “ Coding – 07 ” then click on “ Long Coding Wizard ”
5 – Choose byte “ 04 ”
Then check bit 0 (“equipment_ahk, installed”)
Line 10:
3 – Click on “ Select ” then click on “ 6D – Trunk Elect. ”.
4 – Click on “ Coding – 07 ” then click on “ Long Coding Assistant ”
5 – Choose byte “ 01 ”
Then check bit 7 (“trailer, 0 = not installed / 1 = installed”)
Line 11:
3 – Click on “ Select ” then click on “ A5 – Frt. Sens. Drv. Assist ”.
4 – Click on “ Security Access – 16 ” then type the code “ 20103 ”
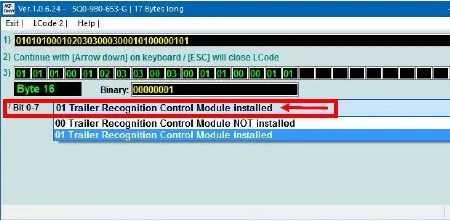
5 – Click on “ Coding – 07 ” then click on “ Long Coding Wizard ”
6 – Be careful to choose the line according to your camera reference!
Select byte “ 16 ” (Camera 5Q0)
Then check bit 0-7 “01 trailer_control_module, installed”
OR
Select byte “ 11 ” (Camera 3Q0)
Then check bit 0 (“AAG, 0 = not_coded / 1 = coded”)
OR
Select byte “ 05 ” (Camera 2Q0)
Then check bit 4 (“AAG, 0 = not_coded / 1 = coded”)
Line 12:
3 – Click on “ Select ” then click on “ 69 – Trailer ”.
4 – Click on “ Coding – 07 ” then click on “ Long Coding Wizard ”
5 – Choose the byte “ 01 ”
Then check Bit 0-3 “01 Diagnosis of the line to the socket, active”
Select byte “ 03 ”
Then check Bit 0-3 “01 Terminal 30 output (pin 9 socket), activated”
OR
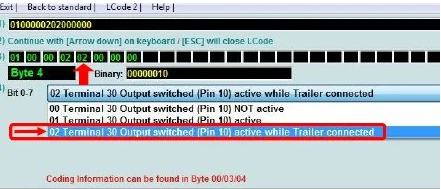
Select byte “ 04 ”
Then check Bit 0-7 “02 Terminal 30 output switched (pin 10) Trailer connected”
